Accruent Lucernex 26.01 Release Notes
We're delivering this automatic upgrade to UAT (TRAIN) environments on January 16, 2026, and to production environments on January 30, 2026, with these highlights:
-
Import Rent Invoices: Import a PDF invoice and extract its transaction detail .
-
-
Percent rent calculations now support sales years, periods, and breakpoints that change mid-month.
-
Use an annualized algorithm to calculate the natural breakpoint in rent calculations.
-
-
Retro Payments: Concise Preview and Success messages that are easy to understand.
-
Change Escalation Percent: Update expense schedules with escalation changes, recalculate future payment schedules, and apply retroactive adjustments.
-
Sticky Headers: Column headings on the Manage Budget Types page of the System Administrator Dashboard remain visible while scrolling, making updates easier.
-
Database Schema Changes: New fields added for enhancements in this release.
-
Improvements and issues fixed.
Import Rent Invoices
LUC-16566
Rent often needs to be paid before a landlord's invoice is received, which means that Lucernex invoices are generated first. The associated expenses and transactions must then be matched with the landlord's invoice when it is received.
From this release, you can import a PDF invoice and extract its detail using the Import Invoice option that we've added to the Payment Info > Transactions page in the Contract module.
This feature is available if Allow LX Invoice is selected on the Manage Company page in your firm. To request this feature contact Accruent Support.
-
On the Contracts module, click Payment Info > Transactions.
-
Click Import Invoice.
-
If you have not yet uploaded the invoice PDF on the Documents tab:
-
Select the folder to upload to.
-
Click Upload.
-
Complete the dialog that opens:
-
Description
-
File Type: Select Document.
-
Author: Select or enter the author of the document.
-
Release Document Immediately: Select to make this document immediately available to everyone. If cleared, the document is only visible to you.
-
Send email notifications?: Select to send a notification to anyone who is a member of the folder where you are uploading the document. Add Recipients and complete the Email Title and Email message.
-
File Name: Click Choose Files and select the PDF to upload.
-
-
Click Upload.
-
-
Select the PDF and click Analyze Document.
The Invoice Review dialog opens. Once the analysis completes, click >> to expand the Analyze Invoice Document pane to fill the screen. Click << to collapse it.
Click Previous, Next, Rotate (°), Zoom In, Zoom Out, and Reset Zoom to navigate and explore the invoice.
-
If required, add additional items:
-
Click Add item.
-
Enter item details:
-
Invoice Line Item Name
-
Amount
-
Remit Message
-
Comments
-
-
Click Add.
-
-
To download the transaction information as an Excel spreadsheet, click Download into Excel
 .
.
Mid-Month Percent Rent
LUC-14741, LUC-15970, LUC-15928, LUC-15877, LUC-15866, LUC-15865
Use lease accounting beyond North America, for example percent rent![]() A lease clause that allows landlords to collect a percentage of a tenant's sales revenue once it exceeds a predefined breakpoint. or turnover rent calculations where sales years, periods, and/or breakpoints start in the middle of a month.
A lease clause that allows landlords to collect a percentage of a tenant's sales revenue once it exceeds a predefined breakpoint. or turnover rent calculations where sales years, periods, and/or breakpoints start in the middle of a month.
Instead of just aggregating sales from the start of the month for the calculation, the system can now calculate the percentage rent from the contract start date rather than the beginning of the month.
Contact Accruent Support to enable the enableMidMonthPercentRent feature in your firm.
When enableMidMonthPercentRent is turned on, the Percentage Rent page within Payment info of a Contract displays the new Is Mid Month? option.
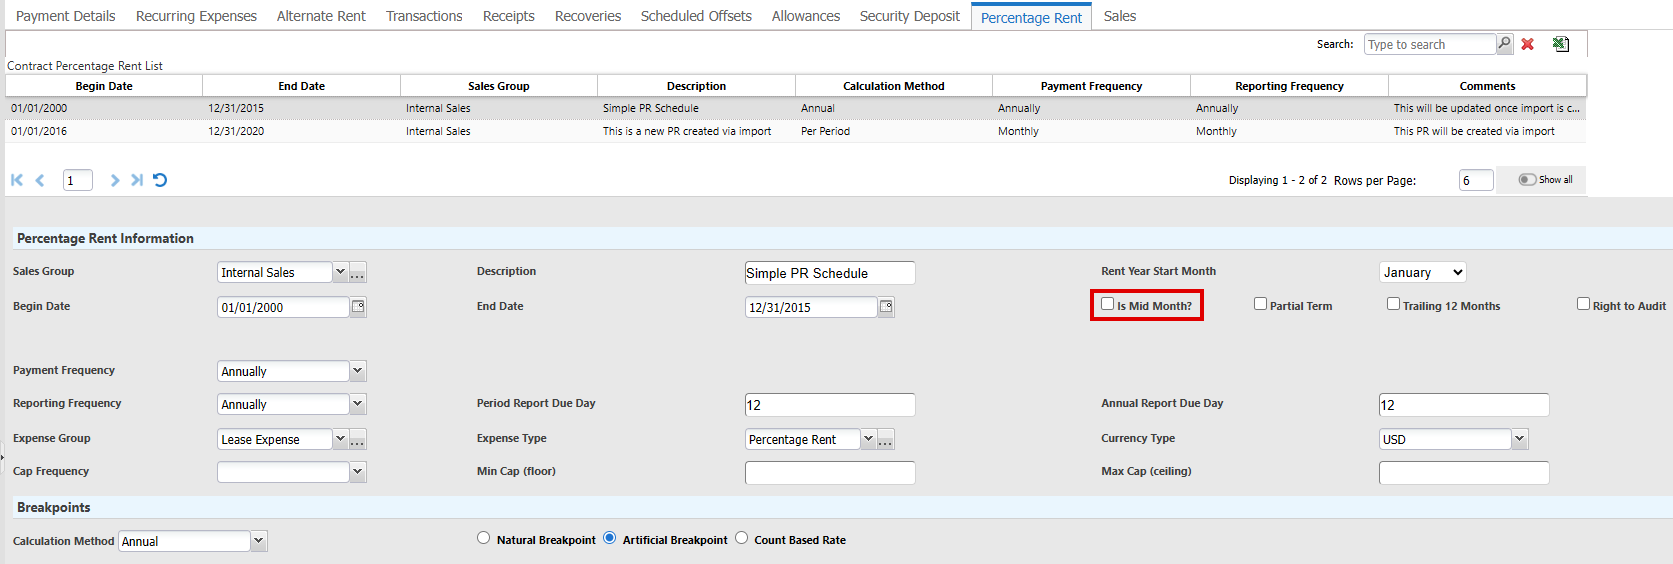
When you select Is Mid Month?, the system supports percent rent periods that start on any day of the month, not just the beginning or end:
-
The system removes Rent Year Start Month, and Partial Term options and Proration Method displays.
-
Daily sales are allocated to the appropriate period even when a period starts mid-month.
-
Breakpoints are prorated correctly when the percent rent period does not align with calendar months, so that they align with the defined sales periods.
-
Enter custom sales periods based on the lease start date.
-
Begin Date for percent rent must be 28th of the month or earlier. If you enter a later Begin Date, a validation message displays.
-
Different leases within the same firm can use different calculation methods and period definitions.
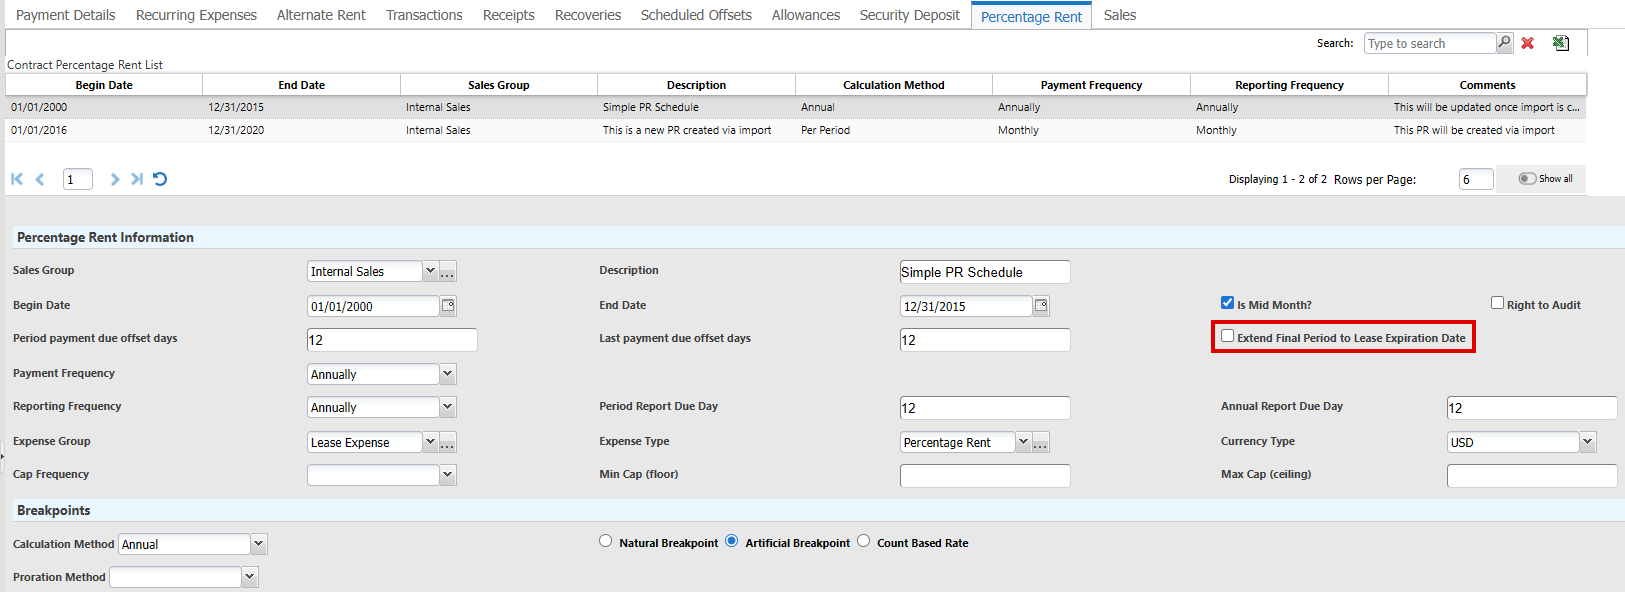
When you select Is Mid Month?, Extend Final Period to Lease Expiration Date displays, which enables you to either keep the default of ending the last period of the lease at the period end date, or extend the number of days in the last period of the lease to the end of the month.
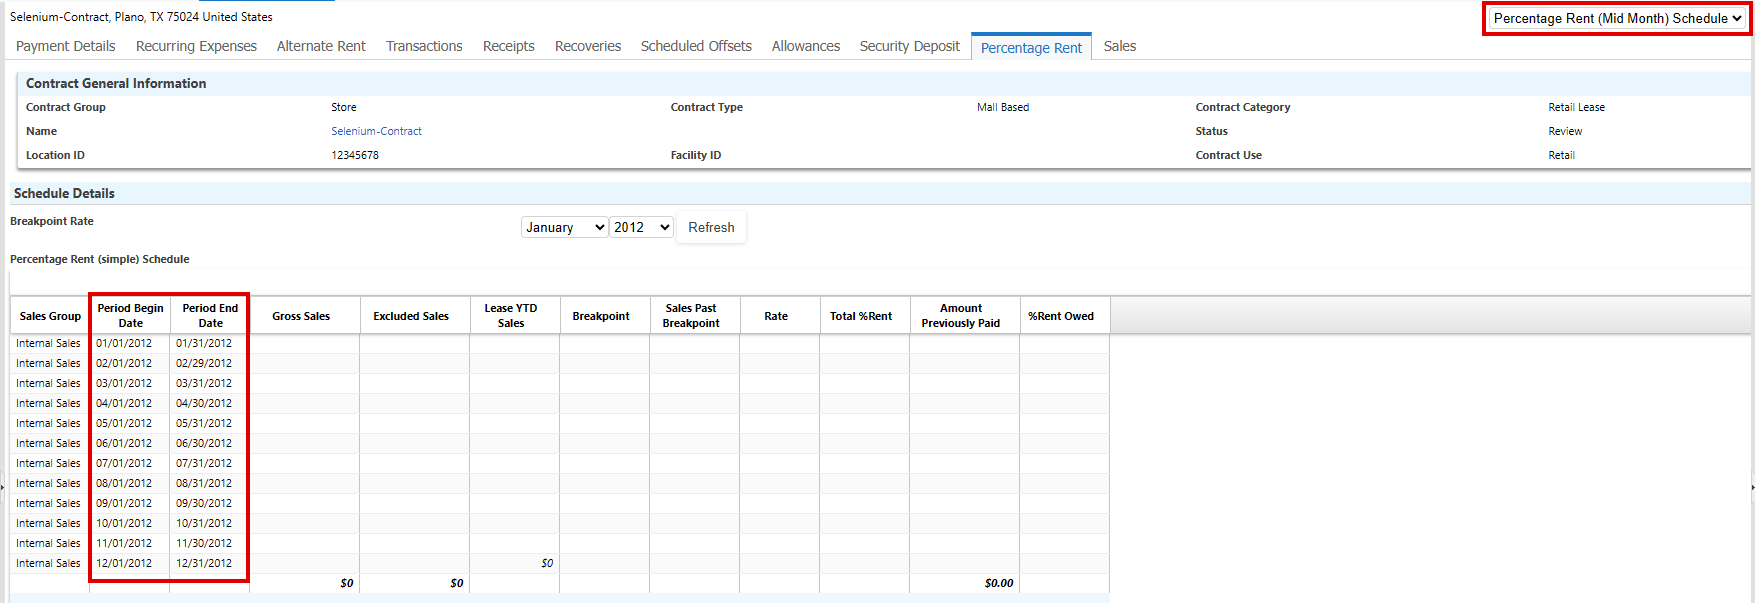
As a result of these changes we've created a new layout Percentage Rent (Mid Month) Schedule on the Percent Rent page that you can select when the enableMidMonthPercentRent feature switch is turned on in your firm. This displays columns Period Begin Date and Period End Date next to the Sales Group column and omits Calendar Month/Year Date. The Period Begin Date and Period End Date columns represent the calendar year, not the fiscal year. The system removes these unrelated fields from the layout when you select Percentage Rent (Mid Month) Schedule:
-
Gross Count
-
Excluded Count
-
YTD Count
To use mid-month rent calculations:
-
Navigate to Contract > Payment Info > Percentage Rent.
-
In a Percent Rent record, select Is Mid Month?.
-
Select Extend Final Period to Lease Expiration Date to extend the last period of the lease to the end of the month.
Clear the option to keep the default of ending the lease at the period end date, resulting in a shorter last period.
-
Select Natural Breakpoint.
-
Select the Proration Method for breakpoint calculations:
-
Annual (actual): Prorates the breakpoint and breakpoint rent based on the actual number of days in the period.
-
First period is not prorated, but full period rent owed.
-
Last period prorates based on the actual number of days in the period.
-
Prorated breakpoint is deducted from sales and percentage rent is applied.
-
Minimum Sales Exclusion Cap is minimum rent owed for any period.
-
No more than the Maximum Sales Exclusion Cap is owed for this period.
-
-
Annual 360: Prorates the breakpoint and breakpoint rent based on 12 equal periods of 30 days.
-
First period is not prorated, but full period rent owed.
-
Last period prorates based on equally divided 12 month periods of 30 days.
-
Prorated breakpoint is deducted from sales and percentage rent is applied.
-
Minimum Sales Exclusion Cap is minimum rent owed for any period.
-
No more than the Maximum Sales Exclusion Cap is owed for this period.
-
-
Annual 365: Prorates the breakpoint and breakpoint rent based on 12 periods in a 365 day year.
-
First period is not prorated, but full period rent owed.
-
Last period prorates based on 12 periods in a 365 day year.
-
Prorated breakpoint is deducted from sales and percentage rent is applied.
-
Minimum Sales Exclusion Cap is minimum rent owed for any period.
-
No more than the Maximum Sales Exclusion Cap is owed for this period.
-
-
-
Click Save Changes.
Annualize Rent Calculations
LUC-15752 LUC-15756 LUC-15355
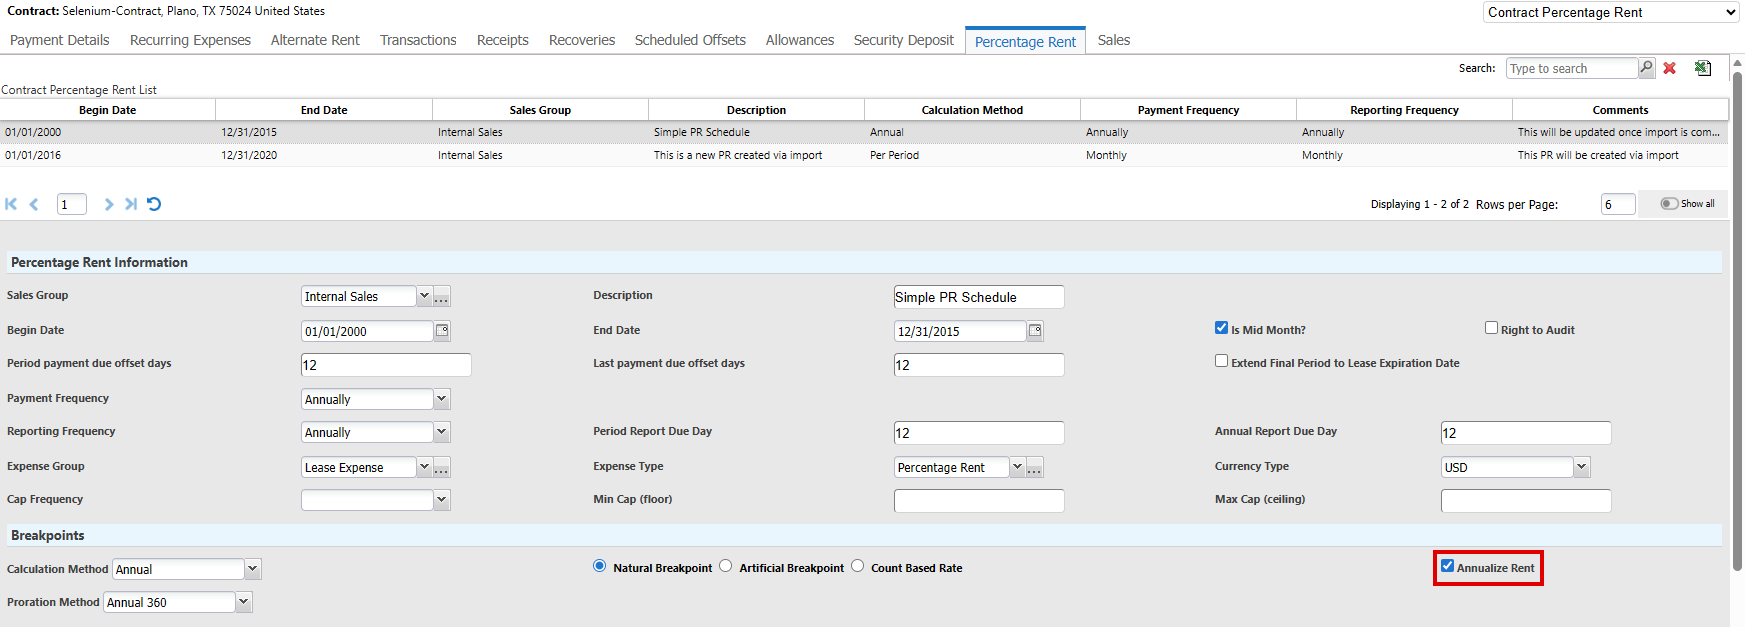
Your organization can opt to use an annualized algorithm for calculating the natural breakpoint in rent calculations.
To use this functionality, contact Accruent Support and request that the enableAnnualizePercentRent feature switch is turned on in your firm.
When the feature switch is turned on, the Percentage Rent page within Payment info of a Contract displays the Annualize Rent option when you select Natural Breakpoint in the Breakpoints section of the Percentage Rent record. The option displays initially when you add a Percentage Rent record, but only applies when you select Natural Breakpoint. The system uses an annualized method to compute the breakpoint. The Proration Method you select determines the number of days at different payment amounts. For example, if rent one is for 90 days and rent two is for 270 days:
-
Rent one = monthly rate x 12
-
Rent two = monthly payment x 12
Calculate the daily rate for each then sum for a total breakpoint for the year.
-
Navigate to Contract > Payment Info > Percentage Rent.
-
In a Percent Rent Record, select Is Mid Month?.
-
Select Natural Breakpoint.
-
Select the Annualize Rent.
-
Select the Proration Method for breakpoint calculations:
-
Annual (actual): Prorates the breakpoint and breakpoint rent based on the actual number of days in the period.
-
First period is not prorated, but full period rent owed.
-
Last period prorates based on the actual number of days in the period.
-
Prorated breakpoint is deducted from sales and percentage rent is applied.
-
Minimum Sales Exclusion Cap is minimum rent owed for any period.
-
No more than the Maximum Sales Exclusion Cap is owed for this period.
-
-
Annual 360: Prorates the breakpoint and breakpoint rent based on 12 equal periods of 30 days.
-
First period is not prorated, but full period rent owed.
-
Last period prorates based on equally divided 12 month periods of 30 days.
-
Prorated breakpoint is deducted from sales and percentage rent is applied.
-
Minimum Sales Exclusion Cap is minimum rent owed for any period.
-
No more than the Maximum Sales Exclusion Cap is owed for this period.
-
-
Annual 365: Prorates the breakpoint and breakpoint rent based on 12 periods based on 365 days in a year.
-
First period is not prorated, but full period rent owed.
-
Last period prorates based on 12 periods in a 365 day year.
-
Prorated breakpoint is deducted from sales and percentage rent is applied.
-
Minimum Sales Exclusion Cap is minimum rent owed for any period.
-
No more than the Maximum Sales Exclusion Cap is owed for this period.
-
-
-
Click Save Changes.
Process mid-month percent rent contracts
LUC-17678, LUC-17514, LUC-17643
Lease accountants can process multiple percent rent contracts in one go, instead of manually processing every single payment for every schedule in each contract, saving you time.
When you select a Payment Period End Date, the system processes mid-percentage rent schedules that have a Period End Date on or before that date.
If a schedule has more than one billing period within the month with none paid, the system combines the billing periods by aggregating the payment amount and determining whether Coverage Begin Date equals First Period Begin Date AND Coverage End Date equals Second Period End Date.
The Payment Transaction consists of:
-
Effective Date: Period End Date
-
Period Payment Due Offset Days: Previously labeled Period Payment Due Days. Determines the number of days by which to adjust the payment due date.
For example, if 5, the payment due date is Period End Date plus 5 days.
If empty, the system uses the Due Date you select.
If empty and the Due Date is empty, the system uses Period End Date plus one day.
-
Last Payment Due Offset Days: Previously labeled Annual Payment Due Days. Determines the payment due date if this is the last payment.
For example, if 5, the payment due date is Period End Date plus 5 days.
-
Navigate to Contract > Payment Info > Percentage Rent.
-
In the upper-right corner, select Contract Percentage Rent.
-
For each mid-month percentage rent record to process, select Is Mid Month? verify Begin Date and End Date.
-
In the upper-right corner of the page, select Percentage Rent (Mid Month) Schedule.
-
In the Actions menu on the rightmost side of the page, click Process Mid Month Payment.
-
Complete the Process Mid Month Payment dialog that opens:
-
Payment Period End Date
-
Contracts to Process: Select Single Contract to only process the selected contract. Select All Contracts to process all contracts.
-
Posting Date
-
Due Date
-
Use posting date for vendor allocation?
-
Portfolio
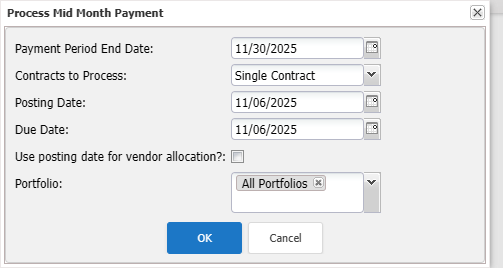
-
-
Click OK.
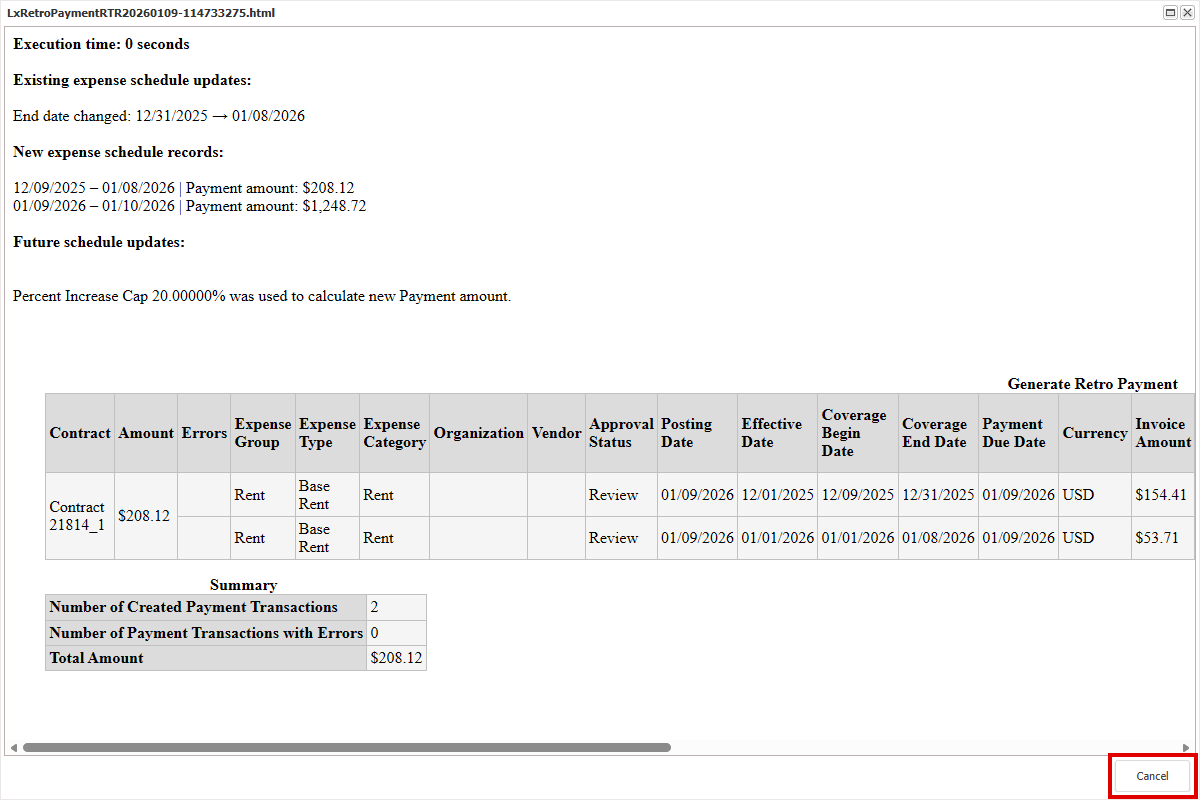
Retro payments
LUC-17311
We've updated the Preview and Success messages when you make a retroactive payment to make them more concise and make it easier to understand the changes.
For example:
-
In Contract Expense Setup List, select the expense setup record to create a retro payment for.
-
Click Retro Payment in the Actions menu on the rightmost side of the page.
-
Complete the Retro-Payment Setup dialog.
-
Preview a summary of the changes to be made once the system creates the retroactive payment:
-
Click Preview Payment.
A message appears with a summary of the changes.
-
Click the link above OK to view transaction detail.
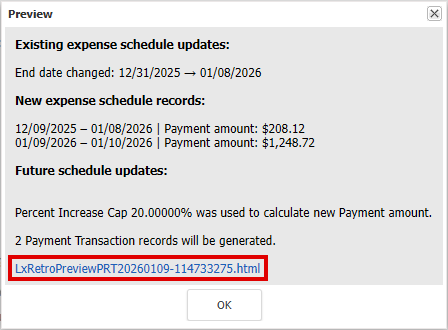
-
Click Cancel to close the window.
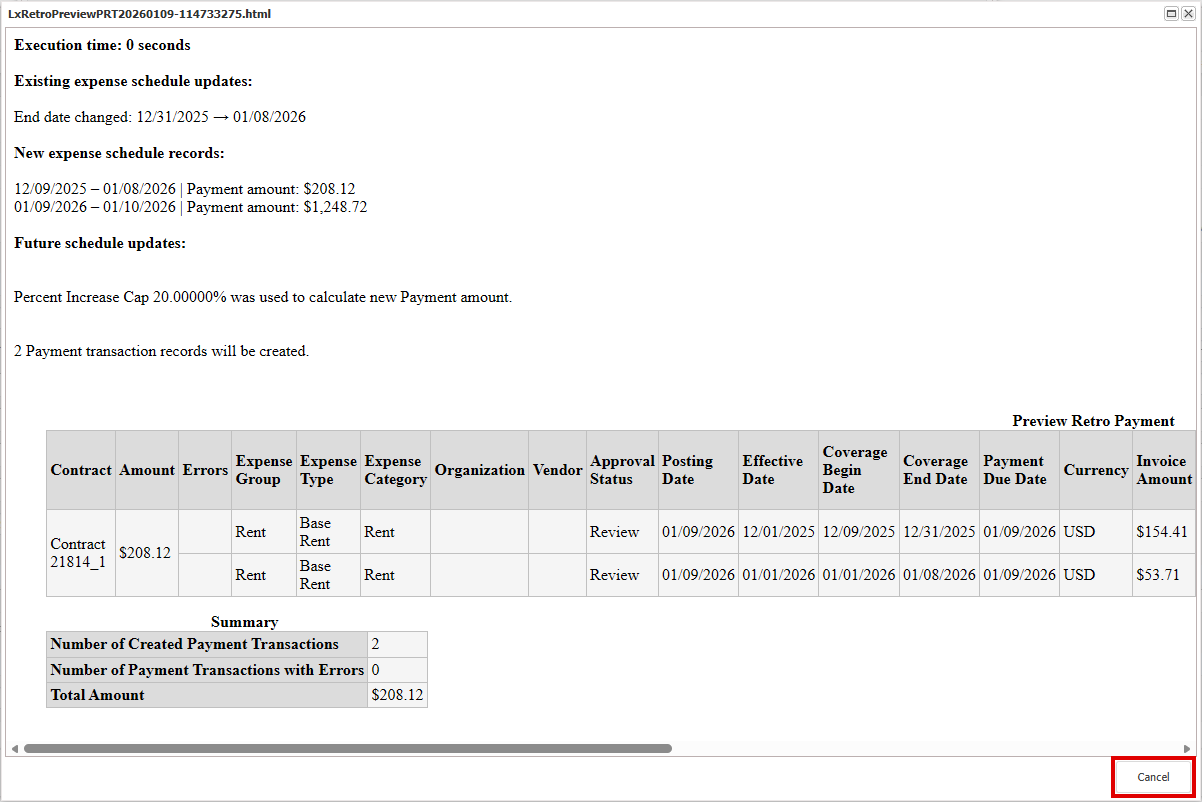
-
Click OK to close the first Preview window.
-
-
Click Create Payment.
A Success dialog opens, confirming that the retroactive payments were created.
-
Click the link above OK to view transaction detail.

-
Click Cancel to close the window.
Change Escalation Percent
LUC-17037
Update Expense Schedules with changes to escalation then recalculate future payment schedules and apply retroactive adjustments to payment schedules. Helping you with compliance and reducing your manual work.
Contact Accruent Support to enable the enableEscalationIncrease feature in your firm.
Example scenario
-
Original schedule: $1,000 starting January 2024, with a 2% annual increase through December 31, 2033.
-
Change: In November 2024, you are notified that payments starting January 1, 2025 require a 3% annual increase through December 31, 2025.
In addition, instead of finding out in November 2024 of the escalation change, you are notified in April 2025 of the increase to 3% effective from January 1, 2025, and you need to adjust payments from January 1, 2025 to April 2025 and beyond.
You now need to:
-
Update expense schedules: Update escalation rates for future payments within an existing schedule and recalculate all subsequent payment amounts.
-
Make retroactive adjustments: Delete or recalculate existing schedules.
Update expense schedules
We added the Update Expense Schedule option so that you can update Expense Schedules on an Expense Setup record.
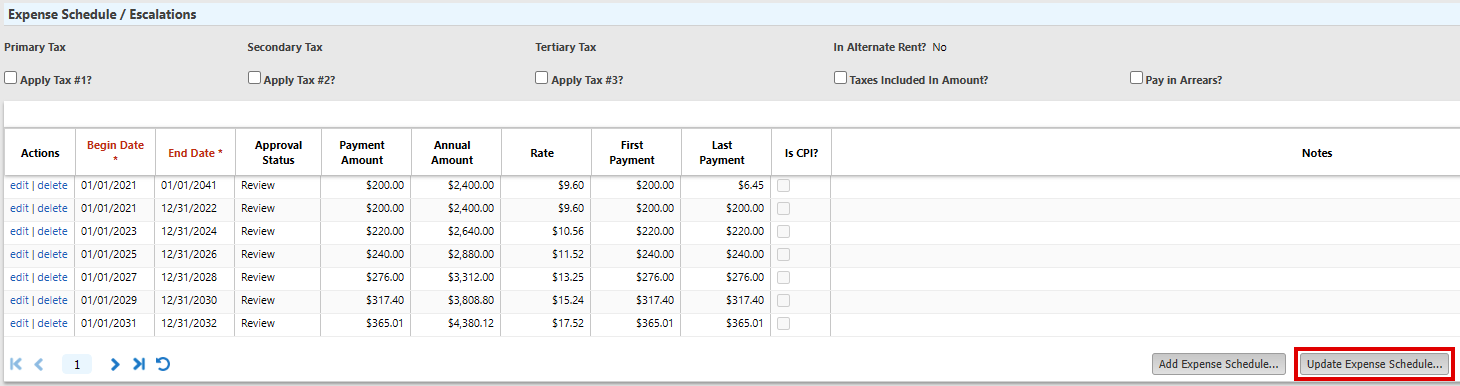
-
In the Contract, navigate to Payment Info > Recurring Expenses using the links in the Navigation Pane on the leftmost side of the page, then select the Expense Setup page in the upper-right corner.
-
In Expense Schedule / Escalations, click Update Expense Schedule.
If the option does not display, the enableEscalationIncrease feature switch may not be enabled in your firm.
-
Complete the Update Expense Schedule dialog that opens:
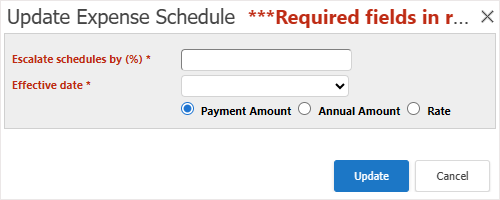
-
Escalate schedules by (%): Enter a positive percentage by which to escalate schedules.
-
Effective date: Select the schedule date range from which to apply the change.
If there are schedules with a Begin Date after today, all those schedules are listed.
If the list is empty, this could be because there are no Expense Schedules that begin after today. This can occur if you create Expense Schedules without selecting Type of escalation or if Type of escalation is set to None when you create Expense Schedules.
-
Payment Amount / Annual Amount / Rate: Select the value you want to update.
-
-
Click Update.
The system updates all payment schedules where the Begin Date is later than or equal to Effective Date. The new payment amount for each schedule is calculated as the prior period’s payment amount increased by the new escalation percentage. The change is recorded in the audit log, and the expense status is set to Review.
Make retroactive adjustments
LUC-17311
Process retroactive escalation percent changes, ensuring you make correct payments in compliance with the contract.
We added the Update All Future Schedules? option to the Retro-Payment Setup dialog so that if you update future expense schedules where the Begin Date is later than the New Effective Date, the system can now change the Percent Increase on every existing schedule and update all future schedules.
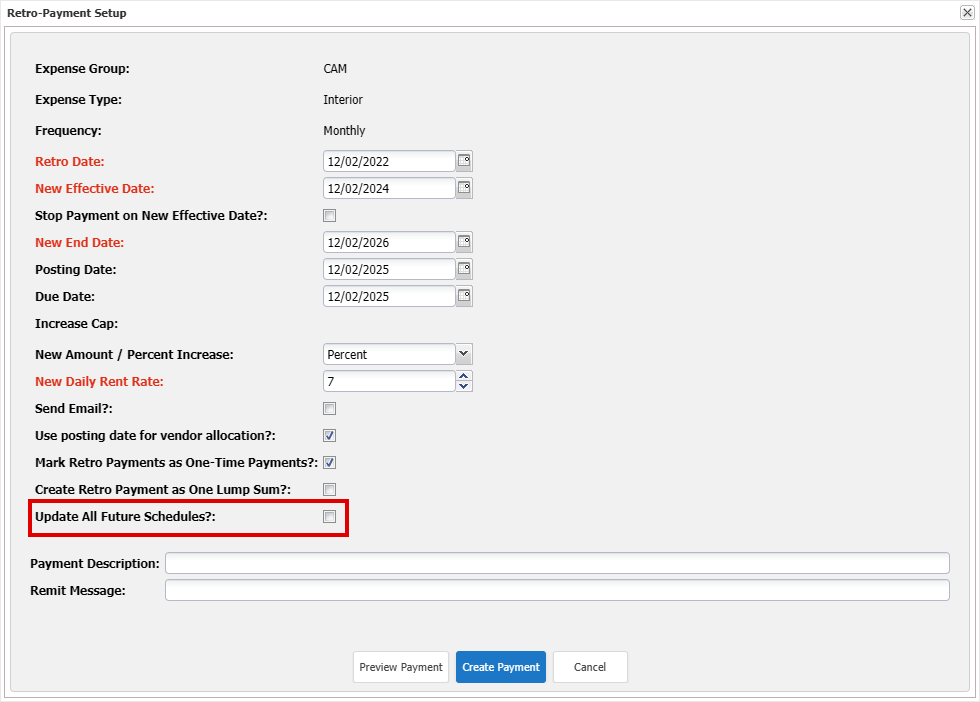
Update All Future Schedules? is available when you select Percent in New Amount / Percent Increase and clear CPI-index Adjustment. Select to update all schedules after the New End Date with the new escalation percentage in New Amount / Percent Increase.
For example:
-
In Contract Expense Setup List, select the expense setup record to create a retro payment for.
-
Click Retro Payment in the Actions menu on the rightmost side of the page.
-
Complete the Retro-Payment Setup dialog:
-
Retro Date: Enter the date that the change is to take place from.
The Retro Date must occur before the New Effective Date. A retroactive payment adjusts expenses for a past period after that period has ended. Because the adjustment applies to dates before the new expense schedule takes effect, a catch-up payment is required to cover the gap between the Retro Date and the start of the new schedule.
-
New Effective Date: Enter the begin date for the new schedule.
-
Stop Payment on New Effective Date?: Select to stop all payments on the listed expense.
-
New End Date
-
Posting Date
-
Due Date
-
Percent Increase Cap: Populates if you entered Percent Increase Cap on the expense setup record.
-
New Amount / Percent Increase: Select whether this revised payment will be charged as an amount or as a percentage.
-
New Payment Amount: New recurring payment amount. Do not enter your catch-up payment amount. The system calculates your catch-up payment automatically.
-
Send Email?: Send yourself a confirmation email once the system creates the retro payment.
-
Use posting date for vendor allocation?: Select to allocate your catch-up payments according to the current vendor allocations. Clear, if the catch-up payment needs to be split between the current and previous vendor allocations.
-
Mark Retro Payments as One-Time Payments?: Mark this retro payment as a one-time payment.
-
Create Retro Payment as One Lump Sum?: Create the retro payment as a lump sum payment.
If cleared, the catch-up amount is distributed in monthly payments evenly between the retro date and the new effective date.
-
Update All Future Schedules?: Available when you select Percent in New Amount / Percent Increase and clear CPI-index Adjustment. Select to update all schedules after the New End Date with the new escalation amount in New Payment Amount.
-
Payment Description
-
Remit Message
Click Calendar
 to select dates.
 -
-
Preview a summary of the changes to be made once the system creates the retroactive payment:
-
Click Preview Payment.
-
Click the link above OK.
-
Click Cancel to close the window.
-
Click OK to close the first Preview window.
-
-
Click Create Payment.
A Success dialog opens, confirming that the retroactive payments were created.
Sticky headers for Manage Budget Types
LUC-17257
Headings on the Manage Budget Types page are now sticky and remain visible as you scroll.
This keeps each column heading fixed at the top of the page, making it easier for administrators to review and update information in long lists without needing to scroll back to the top.
Database schema changes
Benefit from new fields added to the database schema for enhancements in this release. Update your page layouts to display new fields on customized pages.
Look for  in the lower-right corner of the dialog or window to identify customized pages.
Percentage Rent Fields
Use these fields to support percentage rent calculations and calculate the percentage rent from the contract start date rather than the beginning of the month.
|
Field Name |
Type |
UI Label |
Description |
|---|---|---|---|
|
CodeProrationMethodID |
Dropdown (Proration Method Code) |
Proration Method |
Select the calculation option for percentage rent:
|
|
IsMidMonth |
Boolean |
Is Mid Month? |
Set whether percent rent is calculated from a specified day of the month instead of the beginning or end of a month. Displays when the enableMidMonthPercentRent feature switch is on. When selected, Proration Method and Partial Term display. |
|
Annualize Rent |
Boolean |
Annualize Rent |
Displays when the enableAnnualizePercentRent feature switch is on and Natural Breakpoint is selected in the Breakpoints section of the Percentage Rent record. |
|
ExtFinalPeriodToLeaseExpDt |
Boolean |
Extend Final Period to Lease Expiration Date |
Displays when you select Is Mid Month, on the Percentage Rent record. Select to extend the last period of the lease to the end of the month. Clear to stop the last period of the lease at the Period End Date. |
Improvements and issues fixed
|
Summary |
Reference # / Case |
|
|---|---|---|
|
Sign in page |
Click the updated Register for Training! link on the Sign In page to register for Accruent partner training. |
LUC-18900 |